PDP Exclusives by Rebecca

Monday, October 31, 2011

Beauty Buzz: Spooktacular Pumpkin Hair Mask

It is Mozie Monday, and it is also Halloween! So today, Mo tells us how to make a sweet treat for your hair! Perfect for the season, and a sweet treat for your locks!!

Harvest season is here and with that comes falling leaves, yummy food, tricks & treats..... and dry hair! Eeeek! Don't fret, my pet... I've come up with a nourishing recipe that will help keep your locks shining all season long!


More than likely, you have some leftover pumpkin parts from making jack-o-lanterns this year (or you will have some left over from making me pies! lol). Either way, what a fun way to "recycle" some of that delicious waste.
Pumpkins are rich in antioxidants, zinc, vitamins A and C and phytonutrients, which not only protect your hair from UV damage but also smooth, glisten and soften from root to tip!

Ingredients:

  • 1/2 cup pureed pumpkin
  • 1/4 cup plain natural yogurt
  • 2 tablespoons honey
Instructions:
  • Using a food processor or blender, puree your pumpkin
  • Combine other ingredients and continue to mix until creamy paste forms
  • Saturate your damp hair from root to tip and cover with a shower cap or towel for 30 min.
  • Rinse off with lukewarm water.
Information:
  • This recipe is recommended for all hair types, but will benefit dry/damaged hair the most. If you have extremely greasy hair, feel free to add an 1/8 cup of apple cider vinegar to avoid over-moisturizing.
  • Use as desired. Please mix fresh batches as needed, do not store.
  • Agave Nectar may be used in place of the honey for our vegan friends!
Mo is the beauty and brains behind Madd Style Cosmetics. You can shop with her on Artfire, or follow her on Facebook. Her page is ALWAYS full of makeup and beauty inspiration!! 

Friday, October 28, 2011

Krissi's Art Studio: Sugar Skull Masks!

Union Riveter Krissi Sandvik created some fun masks this week modeled on Mexican Día de los Muertos sugar skulls, and now she's going to show you how to make your own!

My friend and hairdresser, Betty, and I talk about Mexican folk art and culture constantly.  Her heritage is Mexican, while I first became enamored with all things Mexico when I lived in San Francisco's Mission District, a vibrant neighborhood with a large Latino population. I really love Day of the Dead, which mixes both Aztec and Spanish beliefs and cultures into something new and wonderful. This holiday particularly appealed to me as it focuses on death as a part of life and not as something to be feared.  Well this year, Betty is teaching a series of classes (she teaches for Paul Mitchell) with a hair/fashion show.  In Mexico City. On Dia de los Muertos, and she asked me to make some sugar skull masks for the models!  Woo hoo! Here's what I came up with:


You will need:
  • Mask - plastic, Papier-mâché, or even ceramic if you are creating a wall decoration
  • Rubbing alcohol
  • Glue - choose one that is appropriate to the substrate of your mask
  • GLITTER! - lots of it in lots of colors!   You can use just about any type of glitter (loose or glitter-glue).  DO NOT USE antique German glass glitter or any glitter made of glass.  It will be near your face (and eyes), so let's not go blind, m'kay?
  • Paintbrushes for glue, water, toothpicks, paper towels, fluffy paintbrush for brushing away loose glitter
Optional supplies:
  • Plastic primer
  • Clear/white glitter spray (I didn't use this, but will point out where you could)
  • Glitter tray or folded paper to return loose glitter to jars
  • Dryer sheets <--- secret weapon when using glitter!
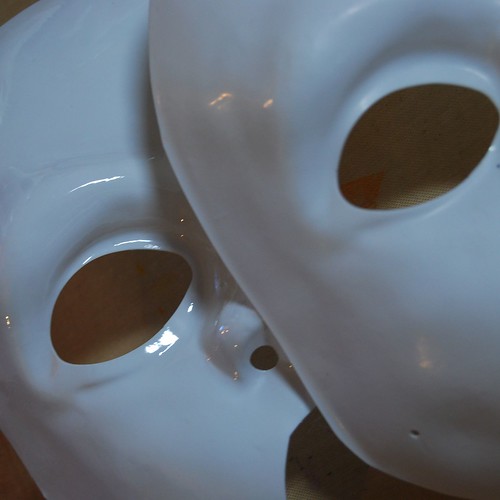
Betty chose some 1/2 face 'Phantom of the Opera' style masks, but you could use eye masks or full face masks if you prefer.  You could use plastic, papier mache, fabric masks or even ceramic ones for a cool wall hanging.

primer
unprimed mask (left) and mask with adhesion
promoter and matte white primer (right)
1.  Remove the elastics and set them aside, then clean the masks with some rubbing alcohol to remove any residue or fingerprints.

1a.  OPTIONAL STEP - skip if you just need the mask for one night.  Since these masks will be packed and taken with Betty to Mexico, I chose to prep my masks to ensure the best contact between the products and the mask.  I started with an adhesion promoter for plastics (from the auto section of my local hardware store) and then added a layer of matte white primer for plastics (don't use gloss or you'll be back where you started).

blackbase1b. OPTIONAL STEP: You could spray your entire mask with clear glitter spray at this point to give the entire face a "sugary" look!

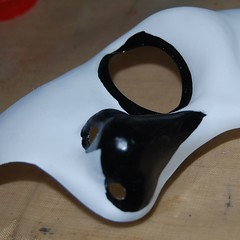
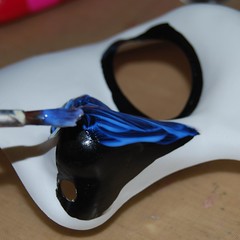
2.  Paint or sketch an outline of the shapes you want to create.  Painting your shapes first helps to make sure the glue goes where you want (working with white glue on a white mask is a bit confusing).  Also, pre-painting helps to prevent the white from peeking through the spaces in the glitter, I painted the nose and around the eyes with black paint (I tried at first with sharpies, but they were a bit trickier on the "topography" of the mask - a brush is more forgiving).

IMPORTANT TIPS! 
  • If using loose glitter and glitter glue, START WITH LOOSE GLITTER first
  • WORK FROM DARK TO LIGHT COLORS!  It's much easier to get a grain or two of yellow out of your black sections than to get black out of your yellow, etc.  Trust me on this one.


glue 3.  Brush your glue over the DRY painted area (a brush gives you more control and precision than squeezing from the bottle).  I chose a flexible fabric glue for gems and beads, because I expect the masks to flex a bit during travel.  Most people would get great results just using a good quality white craft glue.

IMPORTANT TIP!  WORK WITH ONE COLOR OF LOOSE GLITTER AT A TIME.  Don't paint glue on for more than one color of glitter.


4.  Pour that glitter on!

Crafty Chica Be-Bob Black glitter
by Duncan Crafts
Tips - using a glitter funnel/tray is very helpful (mine is a Tidy Tray which I scored for a few bucks at a craft show), but if you don't have one, you can use a piece of paper, folded in the center to return unused glitter to the bottle.  Want another tip?  Rub a dryer sheet over the surface of your funnel tray or paper before sprinkling glitter - it will keep the glitter from sticking and return more to the bottle for you to use later!

5.  Repeat for each color of loose glitter.
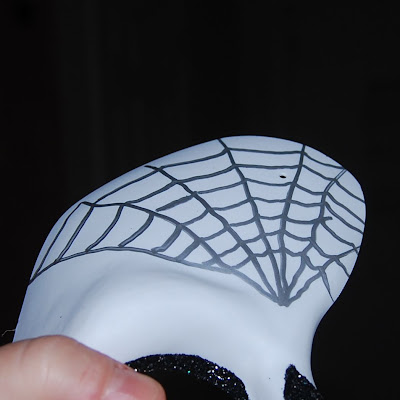
pattern traced with a silver Sharpie
Glue painted over spiderweb pattern
Pour that glitter!
This is Tulip (by Duncan) superfine holographic silver washable glitter.
I could NOT live without this product.


6.  Did you miss a spot?  No worries!  Just pick up some glue on a toothpick or bamboo skewer and fill in the blank spots, then add more glitter.
I love bamboo skewers and keep them in my craft drawer at all times.
This glitter is Crafty Chica's Pop Star Purple by Duncan
Let the loose glitter set/dry between layers OR if using glitter glue next, you can move on immediately.

8.  When you re finished with your loose glitter application for the day, you can start applying glitter glues.
I love glitter glues and swear by Ranger's "Stickles" glitters;
while the bottles are small, they last a long time and are very fine
 and acid-free.  You can find them at most crafting or scrapbooking shops.
Sometimes I like to blend colors together, like the yellow, orange and red in the flames.
Once again, toothpicks and bamboo skewers are VERY helpful!  Just run them back and forth in the glitter and you end up with an artsy fartsy look.

9.  After everything dries (I let it dry overnight), brush off the loose glitter with a fluffy paintbrush.

10.  If you like, you can add some silk or crepe paper flowers.  I attached these with a little hot glue and some E6000 (because they were traveling to Mexico - yours will be fine if you use hot glue).
A few flowers from the Dollar Store and a plastic skull from the Halloween section at my local craft shop!
Leaves and flowers from the Dollar Store, and a plastic skull bead glued to a butterfly from my local craft store.


THAT'S IT!  Now you can just reattach your elastics and rock the party!

Let me know if you have any questions - I'm happy to answer them here.

If you make one, please post a picture on our Facebook page or drop me a note.


Krissi Sandvik is a mixed-media artist and the owner of Krissi's Art Studio, home of Skelekitty and Friends. She was recently named "best tutorialer on the web" by her friend Rachelle Rose and she publishes a tutorial or answers a question from "Ask Krissi's Art Studio" every Friday.

Thursday, October 27, 2011

No Excuses This Halloween Season

Our Union Riveter Wenchkin loves all things Halloween.  You've seen her pumpkin-carving skills and her bat hoodie costume on the cheap.  Here are some more ideas for cheap, last-minute costumes (you know, in case you 'suddenly' are invited to a party).

So I keep hearing about how expensive costumes and candy are. I get not wanting to deal with trick or treaters, but Halloween was and always has been my favorite holiday. It is a big play day for me where I get to be someone else. When I was a kid my grandmother made all my costumes for me and I continued to make my own later in life.

I think in this day and age where everyone is understandably concerned about money, we need to learn to take back our holidays. There is no reason to not have Halloween because you cannot afford it. My mom often had craft parties for us kids that consisted of all the moms pitching in with some juice or cupcakes and whatever craft materials they had at the house. There are countless links to be found Googling DIY halloween crafts or even going to Martha Stewart's site and browsing it (she even has a "last minute Halloween ideas" section).

Costumes do not need to be expensive, a little imagination will go a long way.

Look what we found just
by Googling cheap costumes!
  • Mummy: two bucks worth of gauze got me a mummy costume
  • Instant Nerd: broken glasses, tape on the nose and a fake paper pocket protector 
  • Kitties: for 6 bucks you can get any variety of tail & ear packs for just about any feline
  • T-shirt ninja: you just need all black and a black tshirt, Google it
  • Vampires: all you really need is teeth or glitter
  • LEGO blocks: you need a box, six plastic cups cut in half, glue and some paint
  • LEGO man: round bucket, plastic cup cut in half, glue, yellow paint
  • Butterflies, Lady Bugs and Ninja Turtles: all be easily done with straps, cardboard and some paint.
  • Freudian Slip: print picture of freud, attach to a slip
  • Be a T-shirt Ninja!
    Just add black clothing and you're all set.
  • Tourettes Guy: wire framed glasses and neck brace
and that is just to name a few of the possibilities out there.

Take back the holidays, do less shopping, more making, make your own traditions and involve your friends and family. You can do it, you are only limited by your imagination.


Wenchkin is the amazing artist behind Wenchcraft, the Art of Wenchkin. You can find her on Google+, on Facebook, or you can shop her ArtFire shop! She currently resides in Albuquerque with artist Scott Krichau, and their tripod Jack Russell "P."

Wednesday, October 26, 2011

Hot Rivet: Pet Zombie Creations

I know it is not even Halloween yet, but we need to start talking about the holidays coming up! Buying from handmade artisans and independent artists, and shops is a great way to boost our economy. It also allows for you to purchase and give a very unique gift to your loved ones!

Being in the DIY community for so long, you begin to see a lot of jewelry. There are some great sellers out there, but let's face it... a necklace is a necklace, and earrings are earrings. It really takes something to stand out in the crowd. Pet Zombie Creations is a shop that does that, and more. It not only is full of amazing necklaces and pendants, but it is run by who is quite possibly one of the most amazing women in the DIY jewelry community.  Destry is the artist behind Pet Zombie Creations. Yes, that is her real name, is is one letter off from destroy, and it is AWESOME!! Destry is a pink-haired mommy to a pack of fur babies from Texas.


Now, I know that you will all find this hard to believe, but my FIRST ever DIY purchase was from Destry. Her painting still hangs in my studio, I look at it every day, and that was well over 5 years ago! I own around 10 of her jewelry creations, and have a wish-list a mile long! Her pendants are well made, and contain a very eclectic mix of upcycled items, fun imagery, and beautiful designs.
Destry has even created pendants out of scraps of fabric from some of my bag creations, like this black and white one! How fun is that? A Pet Zombie necklace would make an amazing stocking stuffer, or a gift for a teen that is hard to shop for!
Pet Zombie Creations is having a sale in her Etsy shop right now! You can take 20% off with code winter22. So start shopping now, and help support an amazing handmade artisan!

Brooke is the owner and seamstress at Brooke Van Gory Designs. She lives in The Chicago suburbs with her two kiddos, and her rock star husband! You can shop BVG here, and follow her on Google+ here.

Tuesday, October 25, 2011

The Brooke Van Gory Guide to Sewing Products What is HOT and what is NOT!

Brooke here, and this is the post you all have been waiting for! The one where I tell you all my FAVORITE products to get you started to becoming a world class seamstress! Or at least, to have the tools that all of us love.

Getting your studio all set up can be a daunting task. Where do you even start? What do I need? Don't worry, this post will not only help you get all set with what you need, but it will also save you money in the long run.
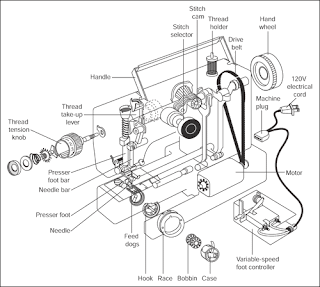

First things first, you need to look into a machine. This is the #1 question people ask me. It can be the most daunting thing to purchase, because there is such a wide range of machines, with a huge range in price tags. I will tell you this first: you get what you pay for. When I first started sewing, I chewed through machines like it was no one's business. It was AWFUL. And each time it broke, I would have to take it to the repair guy, pay over 100$, and not have my machine for up to 3 weeks NOT GOOD! But, you also don't need to sell your first born for a decent machine. As far as brand loyalty, I am a Husquvarna Viking gal. I own two Emerald 116 machines (retail about 399$) and I love them.

But I have owned other machines, let me list them for you:

Singer: Horrible, not worth your money. The internal mechanics of the machine have plastic parts that will break over time, and most shops will not even repair them, they will just tell you to buy a new machine.
Brother: A step above Singer. Do NOT purchase these from Walmart,though. The models Walmart sells are made specifically for them, and contain more internal parts made of plastic then if you purchase a Brother or Singer from a sewing gallery! I would never purchase one, but...
Bernina:I have owned these, and still have one for my light sewing. They are awesome little machines for the price, and for a hobby seamstress, they are wonderful!
Kenmore: I had one, and returned it. But my good friend Jinx of MTCoffinz loves here, though it is one that is on the higher end.

Janome: I would say this is on par with a Bernina. I have never owned one, but I do know some amazing seamstress friends that love these machines, and own more then one.
Juki: This is the mother of all machines. If I win the lottery, a Juli will be the first thing I would buy. They DO sell some lower priced models, though I am not too sure how they perform, I don't know anyone that uses the non-industrial one.

Now on to scissors!A good pair of shears will cut your prep time in half, and cause less of a headache in piecing pattern pieces together. I use Marks shears, but they all are vintage, and not available anymore. Gingher shears are amazing, but carry a hefty price tag. But, as in the case of the machines, you get what you pay for. Fiskar shears are OK, you just will need to sharpen them often. The one thing to remember when purchasing shears is to get a pair with BOTH cutting edges smooth. I once made the mistake of getting a pair that had one side with tiny teeth on it. You can't sharpen those. ;)

Needles for me are usually whatever is on sale. Lately I love Schmetz needles, and I can get them 50% off about twice a month at Joanns. I also love Organ needles. Remember you will need to replace your needle every 6 hours of sewing, or it is breaks or bends.

Pins are a dime a dozen, I love the flower head type from Clover, because they are easy to sew over. Pins should vary depending on what you are sewing, and whether or not you take them out before your presser foot gets to them or not. You also will need a pin cushion. Get one. Use it. Thank me later.

For just the basics, this is a good guide to what you would need to get started. Of course, you need fabric, and thread. Also any other notions that your project might need, but that varies from project to project. If you have any questions on any specific products, please feel free to ask in the comments, I will be checking back to answer all questions! Happy sewing!

Brooke is the owner and seamstress at Brooke Van Gory Designs. She lives in The Chicago suburbs with her two kiddos, and her rock star husband! You can shop BVG here, and follow her on Google+ here.

Monday, October 24, 2011

Beauty Buzz: Glowing Peaches-N-Cream Cleansing "Scrub"

It's "Mozie Monday," so that means Union Riveter Mo Love is bringin' the beauty buzz!  Today she has a recipe for a mask that will help keep all skin types skin fresh and glowing during the winter months. 

I'm back with another (tasty!) beauty recipe to help keep your skin looking young and fresh through the upcoming cooler months. The recipe listed below is an extremely hydrating scrub that may double as a moisturizing mask. If used frequently, your skin will acquire a beautiful "peaches and cream" glow!

When it comes to benefiting your skin, peaches are an amazing source of antioxidants, which are known to protect the skin from damaging UV rays by counteracting free radical activity. The repeated use of topical peaches will greatly benefit the elasticity and strength of the skin resulting in a smoother, tighter, glowing mug.

Ingredients:
  • 1/4 small, ripe peach; peeled
  • 1 Tbsp. cream; heavy or light
  • 1 Tbsp. ground oatmeal
  • 1 tsp. ground sunflower seed meal; almond meal may be substituted
Instructions:
  • Using a mortar and pestle or small bowl and fork, mash the peach until smooth.
  • Mix in the remaining ingredients to form a very creamy paste. You may need to adjust by adding more oats or cream depending on consistency.
  • Allow the mixture to thicken for 3-5 minutes.
  • Using your fingers, gently massage scrub onto your face and throat. Allow mask to remain on your face for about 5 minutes.
Information:
  • This recipe is recommended for normal, dry, oily, sensitive and mature skin types. If you have acne or acne rosacea, please feel free to omit the grains so as to not irritate the skin further.
  • When using a mask that contains granular ingredients please do not scrub your face and neck! Gently massage the treatment in using a small, circular motions.
  • If you are using this recipe as a moisturizing mask, simply apply and recline for 20 minutes then rinse with cool water. Because this mask won't dry, be sure to safeguard your hair and clothing prior to application.
  • This recipe is safe to use as desired. Please mix fresh batches as needed, do not store.
Mo is the beauty and brains behind Madd Style Cosmetics. You can shop with her on Artfire, or follow her on Facebook. Her page is ALWAYS full of makeup and beauty inspiration!! 

Friday, October 21, 2011

Krissi's Packing Tape Image Transfer Tutorial

Union Riveter Krissi Sandvik is sharing her most popular tutorial of all time today! "Image Transfers" are a great way to layer ghostly images in your mixed media pieces, collages and polymer clay, they can be used as inclusions in resin jewelry and are a great way to transfer printed text to your work.  There are multitudes of image transfer techniques that use various printers, transparencies, solvents, Polaroid photos... the list continues to grow.  This is one of Krissi's favorite techniques - it's cheap, quick and easy! (originally published by Krissi's Art Studio on 2/17/2010)


Almost every single one of my mixed-media pieces has some kind of an image transfer in it.  Some are gel medium transfers (we'll do that another day, OK?), but most are packing tape transfers.  I prefer them because they are FAST and really easy.  If you goof up, you don't have to wait hours to fix your mistake.  Packing tape is also great for transferring text onto just about any surface you can imagine.
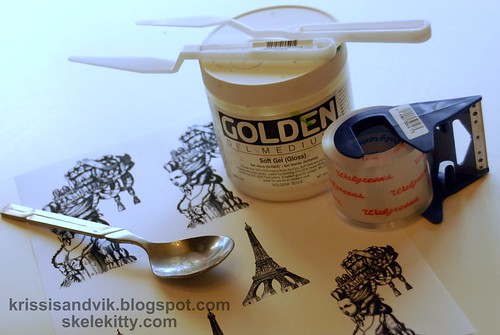
You will need:
  • laser printed* graphics** or text
  • brushes/spatulas
  • clear packing tape
  • a bone folder or spoon
  • gloss gel medium in soft or regular (I prefer regular for uneven surfaces)
  • scissors
  • a small bowl with water
  • paper towels
Tape Transfer tutorial
*NOTE:  I use a pigment inkjet printer by Epson.  Pigment inks give an image transfer that is nearly as crisp as a laser jet or photocopier. If you use a printer with water soluble inks, you will get a faint transfer, if any, when using this technique.
**IMPORTANT:  NEVER EVER use copyrighted images (especially if they're mine).


Place a piece of packing tape carefully over your printed image. Avoid getting wrinkles or bubbles in or under your tape.
Tape Transfer tutorial


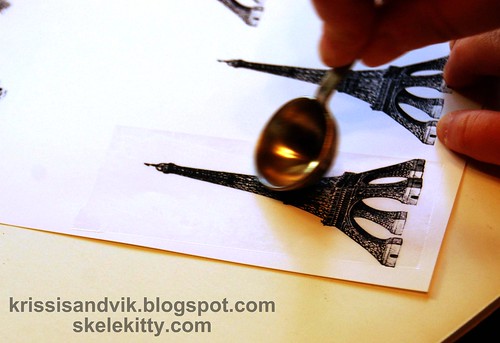
Using your bone folder or the smooth side of a spoon, burnish (rub!) the tape to ensure complete contact between the ink/paper and the adhesive.
Tape Transfer tutorial


Tear away the extra paper from the edges of your tape, turn your image over and peel away some of the paper from the back.  You do not need to peel off all of the paper, but removing some will help the water to penetrate and will make your life a lot easier about 2 steps down....
Tape Transfer tutorial


Submerge your image in a small bowl of room temp/cool water for a few minutes (5 to 10 is usually good, but if you forget it for a couple of hours, don't panic - it's all good).
Tape Transfer tutorial


Using only your fingers, gently rub the paper until it starts to pill up.  Continue to rub at all of the paper residue until it is completely gone.  Your tape will not be crystal clear, but you should not feel any rough spots or bits of paper left.
Tape Transfer tutorial


Once you have removed all of the paper residue, let your tape dry on a paper towel.
Tape Transfer tutorial


Trim up your image and do a dry fitting. Trim more if needed.
Tape Transfer tutorial


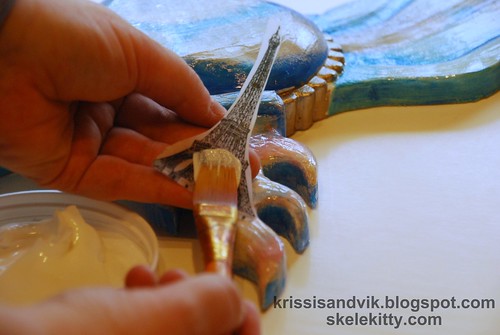
Spread a generous amount of gel medium on your working surface and brush some on the back of your image/tape.
Tape Transfer tutorial


The tricks (and the part where you get messy!):
  • Place your image on your working surface and put a little gel medium over the top to reduce friction.   
  • Using your fingers and starting from near the center of your image, press down gently, but firmly and rub out any bubbles.  
  • Continue to press and rub firmly working outward so that all of the gel medium is pressed out from under the tape (you'll be able to tell when there are no white spots under the tape).  
  • Run your fingers around the edges to ensure complete contact. You are going for as close to 100% contact between the tape and your working surface as you can achieve.  
This little trick will not only help eliminate the appearance of "bumps" around the edges of the tape, but will also reduce your drying time!

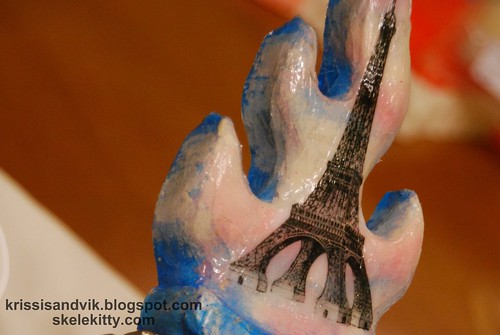
Troubleshooting tips for working on an uneven surface (like this lovely plaster heart here carved and mold poured by my pal and all around nice dude, Cesco). If you are working on an undulating surface, you may not be able to achieve 100% contact between the tape and your piece. So, here's what you do:
  • Lifting beneath the image
      1. Change your uneven surface into an even surface by adding gel medium and leveling it with a credit card or the edge of a spatula.  Let it dry, then start over with a new transfer (you don't want all the old gel medium gunking it up).
      2. Follow the instructions above, but use the side of your finger to press out the extra gel medium from beneath your image.  You will see white spots of gel medium where your image was previously lifting.  Pretend you don't see them.  Your drying time will be increased, but your image will be perfectly adhered in the end.
      • Lifting at the edges
        1. Since tape will not stretch to follow curves, try trimming the edges of your image if that is where the lifting is occurring
        2. A trick I learned for sewing curves: Rather than trimming away excess tape, try snipping inward toward your image in the problem area.  
        3. Use a trick similar to #2 under Lifting beneath the image - use light pressure around the edges and allow gel medium to take up the space between your tape edges and your working surface.
        4. Did you do a dry fitting?  Really?  Are you sure?  I don't think you did.  Either that, or you were in denial and thought this would fit (silly you).  Go back and resize your image and try again WITH A DRY FITTING THIS TIME.
      Trick #2 for keeping the edges from lifting:

      snip inward toward (not into) your image

      To finish: Add a generous layer of gel medium over the top of the image to blend away the edges of the tape.  Your image will look cloudy/milky at first. Let it dry. Drying time can vary from a few minutes to a day or two depending on thickness of gel layers, porosity of your working surface, temperature and humidity.
      Tape Transfer tutorial


      Now GO FORTH AND TRANSFER THY IMAGES!

      Tape Transfer tutorial


      Here's a pic of the winged sacred heart I'm creating for my ol' school pal, Sam.  It's still in progress, but you can see several other tape image transfers (my apologies for the messy photo background).
      Tape Transfer tutorial


      Other stuff you can do with packing tape (I'll continue to update this as ideas come to me):
      • Using rubber stamps and Staz On (solvent based) or Archival inks, stamp onto the clear side of the tape and then follow the application instructions above (you know to let your ink dry fully first, right?  I didn't need to tell you that, did I?)  Oh, and you do stamp/transfers with tissue paper too, but you get a much different look.
      • For a "ghostly" looking transfer, use an inkjet printer to create your images.
      • To transfer larger images, you can "butt" the tape edges up against each to pull the ink, then do it again when putting down your image(s).  Or, if you're lucky and you can find it...
      • You can use the above techniques with clear CON-tact® paper for larger images!
      • Oh, and YES, you can do this technique with colored copies for a really cool effect.

        Krissi Sandvik is a mixed-media artist and the owner of Krissi's Art Studio, home of Skelekitty and Friends. She was recently named "best tutorialer on the web" by her friend Rachelle Rose and she publishes a tutorial or "Ask Krissi's Art Studio" feature every Friday.

        Thursday, October 20, 2011

        How to make an Umbrella Bat Hoodie

        Today I thought I would go over how to make an Umbrella Bat Hoodie. This is one of my favorite Halloween ideas as it is creative and warm. It gets a bit too chilly here on an October night to be running around in a little skimpy costume unless it comes with a bacardigan. So I choose to make my outfits a little warmer. For this I am starting with a ten buck hoodie and buck umbrella from the Dollar Store.


        Now I made a few mistakes in starting this that I do not want you to do. I had originally wanted to keep the metal parts attached to the umbrella. This made it impossible to work around and after I used a wire cutter to pop them all off I was left with sharp edges.
        So, in retrospect I would now start with popping the cap off the end and cutting the umbrella in half.


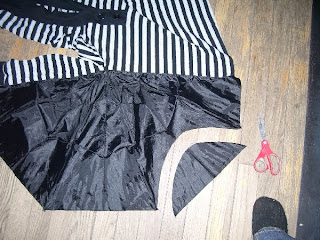
        Then I used an X-acto knife, you can use a seam ripper or scissors to cut off the tabs and the metal frame away from the umbrella.


        I have been left with this, yours should not have the metal parts in it.


        I then take a panel and line it up corner to corner and sew all the way down the length of the sleeve at the inside seam.


        So then I have this, then I got back starting from the arm pit and sew the rest of the wing to the side seam of the shirt. I had planned to use a sewing machine, It gave me a meltdown and so I chose to do this manually, by hand, old school style.


        So now I have this, at this point you can see I have already had my "eff these metal parts meltdown" and bagged them before continuing.


        Then repeat on the opposite side.


        I like the wings but I think they need a bit more style and I also want to add some ears so I go back and make more extreme cuts into the wings making them a little more bat like. I then set the scraps aside for the ears.


        Now I have this.


        I took two of the scraps and cut out triangular ears.


        I then sewed these to each side of the hood.


        Then blam! Done! Bat derp, derping up your Halloween!


        The mask was cut out of an old holy tshirt quite badly.


        There you have it, bat casual!