


Union Riveter Krissi Sandvik created some fun masks this week modeled on Mexican Día de los Muertos sugar skulls, and now she's going to show you how to make your own!
My friend and hairdresser, Betty, and I talk about Mexican folk art and culture constantly. Her heritage is Mexican, while I first became enamored with all things Mexico when I lived in San Francisco's Mission District, a vibrant neighborhood with a large Latino population. I really love Day of the Dead, which mixes both Aztec and Spanish beliefs and cultures into something new and wonderful. This holiday particularly appealed to me as it focuses on death as a part of life and not as something to be feared. Well this year, Betty is teaching a series of classes (she teaches for Paul Mitchell) with a hair/fashion show. In Mexico City. On Dia de los Muertos, and she asked me to make some sugar skull masks for the models! Woo hoo! Here's what I came up with:

You will need:
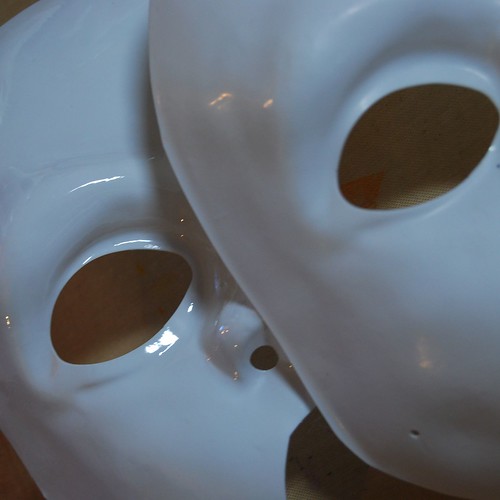
- Mask - plastic, Papier-mâché, or even ceramic if you are creating a wall decoration
- Rubbing alcohol
- Glue - choose one that is appropriate to the substrate of your mask
- GLITTER! - lots of it in lots of colors! You can use just about any type of glitter (loose or glitter-glue). DO NOT USE antique German glass glitter or any glitter made of glass. It will be near your face (and eyes), so let's not go blind, m'kay?
- Paintbrushes for glue, water, toothpicks, paper towels, fluffy paintbrush for brushing away loose glitter
- Plastic primer
- Clear/white glitter spray (I didn't use this, but will point out where you could)
- Glitter tray or folded paper to return loose glitter to jars
- Dryer sheets <--- secret weapon when using glitter!
 |
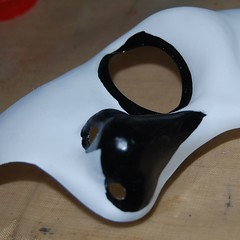
| unprimed mask (left) and mask with adhesion promoter and matte white primer (right) |
1a. OPTIONAL STEP - skip if you just need the mask for one night. Since these masks will be packed and taken with Betty to Mexico, I chose to prep my masks to ensure the best contact between the products and the mask. I started with an adhesion promoter for plastics (from the auto section of my local hardware store) and then added a layer of matte white primer for plastics (don't use gloss or you'll be back where you started).
 1b. OPTIONAL STEP: You could spray your entire mask with clear glitter spray at this point to give the entire face a "sugary" look!
2. Paint or sketch an outline of the shapes you want to create. Painting your shapes first helps to make sure the glue goes where you want (working with white glue on a white mask is a bit confusing). Also, pre-painting helps to prevent the white from peeking through the spaces in the glitter, I painted the nose and around the eyes with black paint (I tried at first with sharpies, but they were a bit trickier on the "topography" of the mask - a brush is more forgiving).
IMPORTANT TIPS!
- If using loose glitter and glitter glue, START WITH LOOSE GLITTER first
- WORK FROM DARK TO LIGHT COLORS! It's much easier to get a grain or two of yellow out of your black sections than to get black out of your yellow, etc. Trust me on this one.
 3. Brush your glue over the DRY painted area (a brush gives you more control and precision than squeezing from the bottle). I chose a flexible fabric glue for gems and beads, because I expect the masks to flex a bit during travel. Most people would get great results just using a good quality white craft glue.
 IMPORTANT TIP! WORK WITH ONE COLOR OF LOOSE GLITTER AT A TIME. Don't paint glue on for more than one color of glitter.
4. Pour that glitter on!
 |
| Crafty Chica Be-Bob Black glitter by Duncan Crafts |
5. Repeat for each color of loose glitter.
 |
| pattern traced with a silver Sharpie |
 |
| Glue painted over spiderweb pattern |
 |
| Pour that glitter! This is Tulip (by Duncan) superfine holographic silver washable glitter. I could NOT live without this product. |
6. Did you miss a spot? No worries! Just pick up some glue on a toothpick or bamboo skewer and fill in the blank spots, then add more glitter.
 |
| I love bamboo skewers and keep them in my craft drawer at all times. This glitter is Crafty Chica's Pop Star Purple by Duncan |
8. When you re finished with your loose glitter application for the day, you can start applying glitter glues.
 |
| I love glitter glues and swear by Ranger's "Stickles" glitters; while the bottles are small, they last a long time and are very fine and acid-free. You can find them at most crafting or scrapbooking shops. |
 |
| Sometimes I like to blend colors together, like the yellow, orange and red in the flames. Once again, toothpicks and bamboo skewers are VERY helpful! Just run them back and forth in the glitter and you end up with an artsy fartsy look. |
9. After everything dries (I let it dry overnight), brush off the loose glitter with a fluffy paintbrush.

10. If you like, you can add some silk or crepe paper flowers. I attached these with a little hot glue and some E6000 (because they were traveling to Mexico - yours will be fine if you use hot glue).
 |
| A few flowers from the Dollar Store and a plastic skull from the Halloween section at my local craft shop! |
 |
| Leaves and flowers from the Dollar Store, and a plastic skull bead glued to a butterfly from my local craft store. |
THAT'S IT! Now you can just reattach your elastics and rock the party!
Let me know if you have any questions - I'm happy to answer them here.
If you make one, please post a picture on our Facebook page or drop me a note.
Krissi Sandvik is a mixed-media artist and the owner of Krissi's Art Studio, home of Skelekitty and Friends. She was recently named "best tutorialer on the web" by her friend Rachelle Rose and she publishes a tutorial or answers a question from "Ask Krissi's Art Studio" every Friday.


 Brooke Heavey


Krissi these are so beautiful! I *love* your flaming heart. Can't wait to try this with Small Child!
ReplyDeleteoooh those are fun!!!! love them!!!
ReplyDeleteThese are delightfully sparkely, and now that I don't have carpet, I can suppress my initial shudder at the thought of using glitter, lol! Brilliant, as always, Krissi.
ReplyDeleteThanks so much you three! Your compliments mean a lot (on accounta I dig you all so much). I was thinking about this the other day and realized that you could probably do this with any old Halloween mask - just paint it white first and give it a spritz of glitter as a base. *nods* Yep.
ReplyDeleteThose are some seriously amazing masks! Totally brilliant!
ReplyDelete