We all can have trouble keeping our families and businesses organized. It can be just downright stressful. Vilate, from Nifty Nappy Diaper has SIX kids, so you can only imagine how difficult it can become for her to keep track of appointments, extra curricular activities, business deadlines, ect. so she shared with us her solution! This can be sized down for a smaller area as well! Brilliant!
With 6 kids and two parents in the house, our schedule around the house can get a little hectic. So I decided we need a calendar in our house!! A nice big one that everyone can write on so we know where everyone is and what they have going on. I saw this idea somewhere and I am sure I made it bigger than the original one. But it is perfect, and I decided to show you how I did it in just a few easy steps!
This is what you will need:
- dry erase vinyl (I found mine on ebay)
- painters tape (I used 1 1/2 inch)
- a way to cut the vinyl (I used my cutting mat, ruler and rotary cutter)
- a tape measure
- cricuit
- vinyl for year and days
- vinyl to decorate (optional)
- a day! really it took me about 6 hrs to do it all
First off you cut your vinyl. I did mine 8X8. I said I wanted it BIG! You could do this any size.
Now what you need to do is make a straight line with your painters tape. I used the measuring tape to measure down from the ceiling, then I put the first square on. After that you use the tape to line up the space for the next square.
You continue doing this until you get all 35 squares on.
The rectangle at the top is for the month. it was 5X18
*note... I moved the month rectangle up after the first picture. I decided I needed to leave more space for the days. So it was 3 inches from the top of the calendar squares.*
I used my cricut to cut out the days of the week and the year on regular vinyl. I used a 12X24 mat for this. You could use any color for this, but I picked black so I can add decoration for all the holidays. **editors note** There are many shops on Etsy and Artfire that sell vinyl decal wall stickers, so if you do not have access to a cricut, you could always ask around for someone willing to help you out, and make some for you!
I added the house, the skulls, and the spider so I wasn't wasting my vinyl.
I also used my gypsy. I love that thing!! I feel like I waste less using it since I have control over where everything cuts and I can see it all before cutting.
For size comparison, had my baby (I know she is 4 but she is STILL my baby) stand by it so you could see how big it really is. Isn't it AWESOME?!?!?!
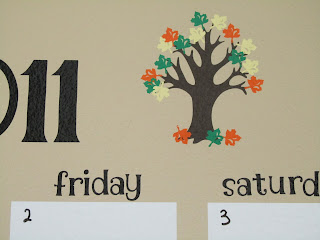
Here is the year and the cute font I used for the days. I choose one that was kinda cutie and funky so that it didn't matter if I got them on perfectly straight! I don't do perfect. LOL!
I added a nice fall tree, and I will use this till I take it down for Christmas.
And TA DA! Here is the finished project. I wrote the month and the days with a dry erase marker, and we are good to go. I am going to go in search of a cute wall basket tonight to hang by the side because I want to be able to keep the markers close so they are easy to access.
I am super excited about this and I can't wait to see it fill up. I think this will really help organize things in our house!
Vilate is a super mommy to 6 kiddos and lives in Colorado. She is also the brains behind Nifty Nappy Diapers. Fan her on Facebook, her page is ALWAYS full of amazing projects, tips, giveaways, and amazing people to chat with!
Vilate is a super mommy to 6 kiddos and lives in Colorado. She is also the brains behind Nifty Nappy Diapers. Fan her on Facebook, her page is ALWAYS full of amazing projects, tips, giveaways, and amazing people to chat with!


 Brooke Heavey


This is GENIUS!
ReplyDeleteAwesome idea!
ReplyDeleteThis is fantastic!
ReplyDeleteawe... thanks ladies. and I am blushing. Those were nice things to say! :)
ReplyDeleteOoooh, that's such a cute idea! Great for organizing, but also for decorating!!
ReplyDelete